EVA foam Wolf Head Pattern
- Posted on
- By Debby
- 21
Important to read, contains instructions!
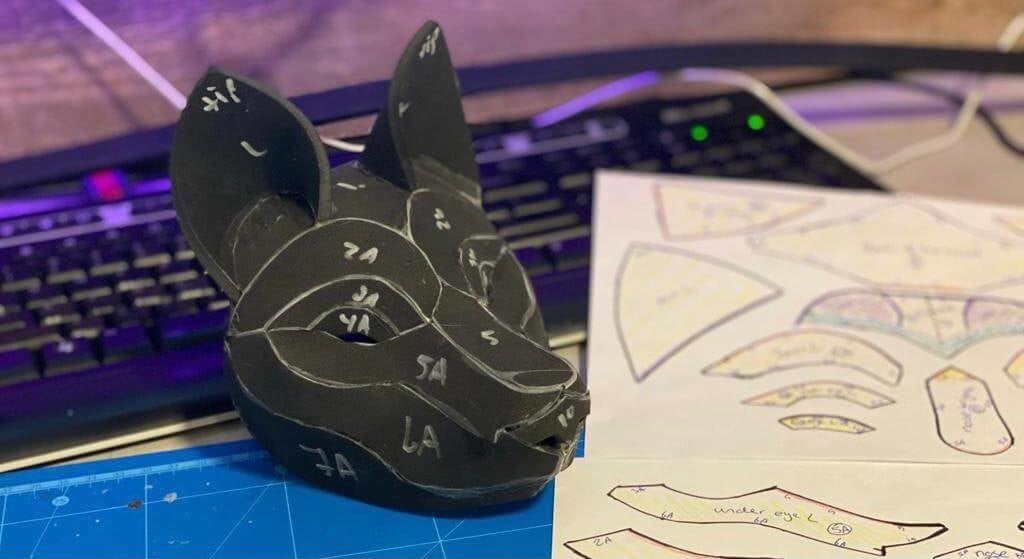
Thank you for your interest in our EVA foam pattern of a wolf's head. We used 5 mm High Density EVA foam for this project because this will become a piece for a shoulder armor, which will have a golden metallic finish for a Red Riding Hood cosplay. You could also use 5 mm Low Density EVA foam, but the High Density EVA foam gives a nicer finish in our opinion. This EVA foam wolf's head can be finished further with Foam Clay, fake fur or paint.
Because this pattern is saved as a pdf, you can scale it to a size that is suitable for your project. For larger sizes choose the option "Poster" in the print menu. If you have found the right size, you can start cutting the patterns after printing. All of the patterns are named and numbered to avoid confusion.
After you have cut out all the paper patterns, it is time to transfer them to EVA foam. We used a white chalk marker for tracing so we could see the shapes, a blue pen works too but is less visible. Immediately after tracing, write the correct numbers from the paper pattern onto the EVA foam pattern. This will keep things clear and show you where to start and which piece goes where.
Use a sharp hobby or utility knife to cut out the EVA foam patterns. When cutting, pay attention to the red lines of the pattern, these red edges should be cut at a 45-degree angle to the inside. After you have cut out all the EVA foam patterns, you can start gluing them. This is best done with a good contact adhesive like our Duracoll, make sure you work in a well ventilated area. Apply a very thin layer of glue on both edges, wait until the glue has become completely matt and no longer sticks to your fingers when you touch it. Now the pieces are ready to be glued together. Keep in mind that when you stick two pieces of EVA foam together, it is almost impossible to get them loose again. If necessary, try to carefully cut the seams with a sharp knife.
Start with number 1, then 2, 3, etc. You will notice that many EVA foam patterns need to be bent. You can do this by hand, or by heating the EVA foam first with a heat gun, which makes the EVA foam more flexible. At number 5, you bend the nose upwards. It is also important to glue the ears first, before you start with number 9. Bend the ears first before gluing them, because this is much easier. Start by sticking the ears on top of the forehead (number 1) and then against the edge of the back (see purple line), following the shape of the pattern (number 1). After this you can continue with number 9 and glue the rest of your EVA foam patterns.
Now your EVA foam wolf head is finished! You can finish it off even more by sanding the sharp edges with a rotary tool and you could add more details to make the wolf head your own style. Do you have any seams you want to get rid of? You can use a filler or Foam Clay for this.
Are you going to paint the wolf's head? Don't forget to heat seal the EVA foam with a heat gun for the best results. Next, it's a good idea to prime the EVA foam with a flexible primer like Hexflex, Flexbond or QuickSpray Primer.
We would love to see your EVA foam wolf head, tag us on instagram or facebook!
Download your free pattern here
Hi, making a movable jaw should be possible. But it might require some trial and error.
Hi, our patterns are intended for personal use.
I don't know
Would it be possible to make it have a moveable jaw? :]
Is this for personal use only? Is there a commercial license for purchase? How much?
Yes go and try it out! love to see your progress!
Hi, you can click on the word "here" in de text in our page where you can find the wolf head pattern. It's the last sentence :
Download your free pattern here
I'm trying to modify a little bit this pattern and make a Haku head.... Maybe? Let's try it. Thank you for the pattern.
We're can I find the base template do I have to pay also?
That is a very good question. We did not test this with glasses. But you can leave the back part out. It will be sturdy enough to attach a elastic band to hold the mask in place. Make sure that you have the right size for your face. Hope my answer helps you further. If you have any other questions please let us know. Best regards Debby - Team Minque
I'm thinking of using this pattern, but before making it I'd like to know, how glasses-friendly is the finished head? I could potentially leave out the back to use it more as a mask so I have more space to work with, but I don't know if it would still be sturdy enough then.
I will use this as a wolf- collar made of fake fur for my son's cosplay costume. Thank you so so much for maling this possible you made it so much easer for me. Thanks a ton again.
Yes ofcourse you have our blessing ;)
Hi, question can this pattern be used a an part of a commercial cosplay part? It will be altered so much it will not be the same as the orginal pattern but still I would like to ask. Or can i only use the pattern for personal use.
Thank you! Awesome pattern !
im a furry
Hi Rin, Thank you for your message. We recomend to give dontcarebear_cosplay (instagram) a message. She made a Arcanine mask from our Wolf template. I think she would know the correct size for a mask.
What size do you recommend it be printed at to use it as a mask? I imagine trying to guess will waste a lot of foam and paper. >.<
Yes you may the files are up again! Just click and start crafting! have fun!
Omg can I have it!!?
EEEEEEEEEEK
Yas gaga yaaaaaaaaas
На сайте очень красиво
Translation: It's very beautiful on the website.