EVA foam pattern Halloween Pumpkin basket
- Posted on
- By Debby
- 0
Important to read, contains instructions!
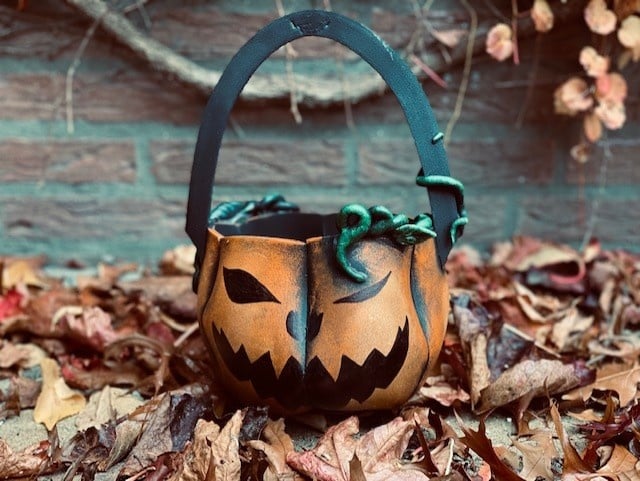
Thank you for your interest in our EVA foam pattern for a Halloween Pumpkin basket. For this project we've chosen for the CF65 5 mm EVA foam because it bends better when making round shapes. We also finished the EVA foam pumpkin basket with a 20 mm EVA foam Bevel as a handle and used Foam Clay in the color black for extra details.
We offer the pattern for free in the form of a PDF file. You can scale it to a size suitable for your project. For larger sizes, choose the option "Poster" in the print menu and adjust the percentage of the scale. Once you have chosen the right size, you can then cut or trim the pieces after printing.
There are actually only two patterns for this project. You may trace the large pattern 6 times onto your EVA foam with a pen or chalk marker. Once you have traced all 6, it's time to cut them out with a sharp hobby knife or box cutter knife. When cutting, pay attention to the purple lines of the pattern, these purple edges should be cut at a 45 degree angle to the outside. The rest (the grey line) you can cut straight.
Once you have cut all 6 in the right way, you can glue them together on the same edges of your 45 degree angles. This is best done with a good contact adhesive such as our Duracoll. Make sure that you are working in a well-ventilated area. Spread a very thin layer of glue on both edges, wait until the glue has become completely matt and it no longer sticks to your fingers when you touch it. Then the pieces are ready to be glued together. Keep in mind that when you stick two pieces of EVA foam together, it is almost impossible to get it loose. If necessary, use a sharp knife to carefully cut the seams.
Start by gluing 2 pieces together 3 times. Then heat up the pieces a little with a hot air gun. This will make the EVA foam even more bendable, because eventually you will have to bend the pieces to the other side, so that a pumpkin-like shape is created. Then you glue all the pieces together in the same way. It may happen that the tension at the seams causes them to move apart a little. But you can always solve this with some extra glue or you can fill the seams with our Craft Filler.
When all the pieces are together, it already starts to take on a pumpkin shape. If you want the round shapes to be extra round, you can heat up the EVA foam again with a hot air gun and continue shaping by hand until it has cooled down again.
If you are happy with the result, you can trace out the small pattern twice. Then you can cut them both out with a straight cutting line. Stick one pattern on the bottom of the pumpkin and the other one on the bottom inside for a nicer finish. You can of course add extra details with Foam Clay, a dremel or a wood burner. Let your imagination run wild!
Do you want to paint the Halloween pumpkin basket? Don't forget to heat seal the EVA foam with a hot air gun for the best result. By doing this, you close the cells on the surface of the EVA foam. This ensures a smoother and more beautiful result. Next, it is a good idea to first prime the EVA foam with a flexible primer such as HexFlex, FlexBond or SealPrime.
For painting you can use Amsterdam Acrylics or HexFlex paint and do not forget to protect your artwork with a transparent coating. The best way to do this is with our flexible transparent spray Valour Clear Coat.
Have fun building your own Halloween basket! Don't forget to tag us!
Download your free pattern here

Comments
Be the first to comment...